Wednesday, November 30, 2011

Ciabatta(ish) bread

Today was one of those days where it felt like all Hell broke loose in my kitchen... Now that I got it back under control it is time to share with you my current to go bread recipe. I usually work in cycles with food, in particular bread. A few months ago I would make an oat and honey whole wheat loaf that would last me a week for lunch but then I moved, quit my job and lost interest in it, don't worry it will come back and when it does I will for sure share it with you. The recipe I am sharing here is a ciabatta roll recipe that was inspired by this book but I had to modify it quite a bit for it to come together. 

I have to warn you that it having a stand mixer made my life so much easier when it comes to home made bread, I actually waited until I had it to make some. This specific recipe requires a few specific tools, stand mixer, pizza stone and spray bottle.

Ciabatta bread
Ingredients:
Sponge
- 1c warm water (160F)
- 1 tsp active dry yeast
- 1 1/2 c flour

Bread
- 1 c warm water (160F)
- 5 tbsp warm milk (160F)
- 1 1/2 tsp active dry yeast
- 2 tsp salt
- 1 tbsp olive oil
- 5 c AP flour
Instructions

- Make the sponge in the bowl of your stand mixer: dilute the yeast in warm water (be careful not to kill it with water that is too hot, if you want to check if your yeast is alive you can let it sit for 10 minutes and it should bloom, otherwise just keep and eye on your sponge), add the flour and mix with spoon until combined. Cover with a towel and let rest for 12h.
Sponge after resting
Sponge before resting

- Gently mix the yeast in the water and milk. Equip the dough hook, add the water mixture, salt and olive oil to the sponge and mix slowly. Add 4c of flour, 1c at a time. Be careful when mixing, you might want to cover your bowl with a kitchen towel. Mix at medium speed until the dough comes together and does not stick to the bowl anymore. Add the last cup of flour and incorporate.
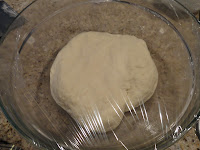
- Oil a large bowl, transfer the dough and gently roll to oil it. Cover with plastic wrap and a towel, let rest in a warm place until it triples in volume, about 1h

- Dump onto a lightly floured surface and cut into buns, trying to deflate the dough as little as possible, transfer onto a baking sheet that you oiled and floured, cover with a towel and let sit for at least 1h in a warm, draft free place

- Preheat the oven to 350F with a pizza stone in it, transfer the buns to the hot stone, being careful not to deflate them too much. Put in the oven spray with water after 3 minutes, repeat twice, then cook for 20 to 25 min.

- Enjoy immediately or at room temperature, once they are cooled I slice them before freezing them

I will share with you the other recipe (sweet and sour chicken) I made tonight and the rest of my story.

Tuesday, November 29, 2011

Leftovers: turkey and rice soup and tart

 Thanksgiving is over but turkey is not, actually that's wrong too, we just put an end to the bird today, that was fairly quick I have to admit. In order to insert some variety in the leftover menu as well as some healthiness I put together a quick and simple turkey and rice (or alphabet noodle....) soup. It is not really a recipe, rather a very flexible, healthy and tasty soup. You could substitute wild rice for any kind of rice, pasta or noodle you prefer, you could also substitute the turkey for some left over roast chicken or even probably go vegetarian. For the last option I would probably suggest adding some bell pepper or other veggies.

The other recipe is probably one of my favorite and most common left over recipe. For some reason whenever I make a pie I end up with some leftover dough, I guess I must roll it a little too thin... I have tried making tarts but that leaves me with some more left over dough. This rustic, basic recipe allows us to go around that issue.

And even better neither of those recipes should require any extra ingredients!!! (except for rice or pasta but who does not have those in their pantry).

Before jumping in those recipes there is an extra step I skipped when discussing my turkey. After carving my turkey and once the feast is over, I take the time to debone it completely before putting the meat away. The next day I break it apart and throw it in a large stock pot with some turnip, carrots, celery, herbs, salt and pepper, similar to the way I make chicken stock. I cover it with water I let it simmer for 4h and then discard the solids.

Turkey pasta soup
Ingredients
- 2 stalks of celery, diced
- 2 carrots, diced
- 1 onion, diced
- 4 c turkey (or chicken stock)
- 1/2 c wild rice (or other rice or pasta)
- 1 c cubed turkey (or chicken)


In a medium pot, heat some oil over medium heat. Saute veggies until they are softened and slightly browned.
 Add the stock and bring to a boil.
 Rinse and drain the rice, add to the stock and cook until tender, 45 minutes for wild rice, much less if you choose to use noodles.
 10-15 minutes before the end add the cubes meat to allow the flavors to come together and warm the meat through. Serves two as main dish. Enjoy hot on a cold day.


Rustic apple tart
Ingredients
- Pie dough
- 1 apple (or whatever fruit you want, I used half apple and pears) thinly sliced
- 1/2 tbs sugar
- 1 egg, beaten for egg wash

Instructions
Preheat the oven to 350F
Roll out the dough on a lightly floured surface then transfer on a baking sheet
Place the fruit slices on the dough in a pretty pattern, leaving about an inch on the sides. Fold the dough over on the fruit, brush the dough with egg wash. Sprinkle sugar over the entire tart.
 Cook for about 1h, or until the fruits are cooked through and the dough is golden brown. Slice and serve slightly cooled, you could serve it with whipped cream or vanilla ice cream.


I hope you enjoy those recipes and their simplicity as much as I do!

Monday, November 28, 2011

Post-Thanksgiving chocolate chip breakfast muffins

Before I discuss the recipe I want to share with you today let me tell you a little bit more about my day. I went out to grab a few things for a some post-Thanksgiving round two recipes. As usually I left with a grocery list but ended up browsing around the store, which led me to one third of my basket not being on my list... Among those items I found... Speculoos cookie butter. Oh my!!!! Trader Joe's et carrying Speculoos cookie butter!!!! I have read quite a bit about it and was already drooling, I made a little happy dance, put it in my basket and headed to check out. I could hardly resist the urge of opening the container and taste it on the way home but as soon I got there I could not contain my self anymore so I took a spoon to it... I don't know how to describe what happened next but it was heaven in my mouth and fireworks in my head... Now I need a good hiding place so I am not tempted to have a spoon of it every time I see it.

This will so be part of my Christmas care packages!!! if you have a Trader Joe's in your neighborhood, follow my advise and run get some before they run out, I might empty their stock of it, I am warning you... I am kind of scared it's only a temporary item for the holiday, it did say "new".

Now let's talk about that recipe. The original recipe is this mini chocolate chip maple pancake cupcakes, I made them for breakfast a while back for breakfast minus the icing. The result was addictive, light bites. I tend to like big muffins for breakfast every once in a while but they tend to be dense so I thought I would try that recipe and it turned out delicious, a little too chocolaty actually so I will leave it up to you but personally I will use 1/4 c next time.

Ingredients:
- 1/2 c (1 stick) unsalted butter at room temperature
- 1/2 c sugar
- 1 1/2 c cake flour
- 1 tsp baking powder
- 1/4 tsp salt
- 1/2 cup maple syrup
- 1 tsp vanilla extract
- 2 large eggs
- 1/3 c milk
- 1/4 to 1/2 c mini chocolate chips

Instructions
Preheat the oven to 350F
Cream the butter and sugar being careful not to over mix it otherwise your mixture will curdle when you add the liquid.
 Mix the dry dry ingredients, flour, baking power and salt.
 Stir just enough of the flour mixture in the chocolate chips to coat them (about 1tsp). Aren't mini chocolate chips adorable?!!!
 Slowly add the maple syrup, vanilla extract, eggs and milk. Whisking well after each addition until well combines. Add slowly in order not to waste 1/2 c of maple syrup if your mixture curdles. Your mixture might curdle a bit but this is not a drama, it will come together once you add the flour mixture.
Add the flour mixture 1/2 c at a time, mix until just combined
 Stir in the chocolate chips
 Line muffins tin with cupcake liners and fill the liners about 3/4 c full of batter (about 5 large size cupcakes). Bake for about 30 min, until a toothpick inserted into the center of the cupcake comes out clean.
Take out of the oven and let sit for a few minutes to slightly cool down. They are great at room temperature as well, they firm up just a tiny bit. Hope you enjoy them as much as we did!!! All 5 were gone by the end of the day.

Sunday, November 27, 2011

The star of the day... Citrus and herb brined turkey with gravy

So here we are finally, the star of the day, the turkey. Turkey is not a family tradition for me but since it is the tradition for Thanksgiving I decided to give it a shot last year, I looked around for a recipe that called my name and settled on that one as a base and modified it slightly based on what I read along the way, I am presenting you with my final recipe. I made it 3 times now, last Christmas and this Thanksgiving, and it turned out perfect every time. 

Trust me there is really nothing complicated about turkey, all you need is to plan things ahead because what makes it tough is its size, here are a few advices. If you choose a frozen bird, know that it should take you at least 3 days to thaw, mine was 13.5lb this year (fairly small bird), I took it out on Sunday evening and when I put it in the brine Wednesday morning it was still a little bit frozen. When you buy it make sure that it comes with gizzard and neck and is not seasoned, brine is ok. Regarding cooking times, I am not yet on target with that but I think you can find an estimate online, I usually go by temperature.

Regarding "specialized" equipment you will need and turkey roasting pan, a container big enough for the brine (I use turkey oven bags, but I had them break on me twice, flooding my kitchen.... so be careful when moving it!!!) and last but not least a meat thermometer.
I have never seen anyone in my family use a meat thermometer but you won't catch me cook a bird without it (chicken or turkey).

Here we go:

Ingredients:
Brine
- turkey
- 1/2 c salt per gallon of water (1c)
- 1/2 c brown sugar per gallon of water (1c)
- 2 oranges, quartered
- 2 lemons, quartered
- 6 sprigs thyme
- 4 sprigs rosemary

Stuffing
- 1 large orange, cut into 1/8ths
- 4 tbsp butter at room temperature
- Salt & pepper
- 1 large yellow onion, cut into 1 inch slices
- 1 stalk celery, roughly chopped
- 1 large carrot, roughly chopped
- 2 sprigs thyme
- 2 sprigs rosemary
- 1/2 bunch sage
- 3 or 4 sprigs parsley
- 4 garlic cloves crushed
- chicken stock, for basting

Broth
- 1 tablespoon vegetable oil
- turkey neck and giblets
- 1 large carrot, roughly chopped
- 1 onion, roughly chopped
- 1 large celery stalk, roughly chopped
- 1 small bay leaf
- 3 c chicken stock
- 3 c water

Gravy
- 4 c turkey broth(complete with chicken stock if needed)
- 1 c dry white wine
- 4 tbsp unsalted butter
- 1/4 cup all-purpose flour
- Salt & pepper

Instructions
 Day before cooking prepare the brine, I prepare it in empty gallons of milk to dissolve the salt and sugar in the water. Place the turkey in the container, if using a bag place it first in the roasting pan, you don't want to handle the bag once it is filled. Squeeze the citrus when adding them. Add the liquid, I use 2 gallons of brine.
 Close the bag (if using a bag), return the turkey and brine to the fridge for at least 24h
 The say it self preheat the oven to 350F and prepare the stuffing, carrots, celery, orange, herbs and garlic.
 Rinse the turkey and pat it dry. Rub the breast with orange slices and rub the entire turkey with butter, massaging some of it under the skin on the breasts season the turkey inside and out. Place the stuffing inside the turkey, tie the legs with kitchen twine and tuck the wings under.
 Place in the oven, baste every 45 min with warm stock and check the temperature inside the thigh, being careful not to touch the bone. The turkey will be done once the temperature reached 165F. Look how gorgeous it is!!! Tent with foil and let rest at least 30 min before craving.

While the turkey cooks prepare the broth, heat the oil in a medium stock pot over medium heat, brown the neck and gizzards (don't be shy on that step or they will take more than an hour to cook...), add the veggies and bay lead and sautee until soft. Add the liquids and let simmer until it reduces to about 4c (about 1h). In the last 15 min add the liver. Pull the meat from the neck, chop the gizzard and liver and set aside.
 While the turkey rests prepare you gravy. 
- Degrease the pan dripping
- Place the roasting pan on 2 burners on medium heat, deglaze with drippings,  white wine and 1 c of turkey stock, stir to scrape the brown bits off. Add the remaining stock and bring to a boil.
- In a large heavy sauce pan melt the butter over medium high heat, stir in the flour cook the raw flour taste out making a light roux.
- Slowly add the stock, whisking constantly to avoid lumps, cook until it thickens (abt 10 min)

Serve as shown in the first picture. I am honestly what part I prefer, the smell that brings me back to my gran ma's kitchen as a child, the delicious turkey or the heavenly gravy (that goes so well with mashed potatoes or even just bread....)  

Hope you enjoyed those recipes!! Now it's time to think about Christmas!!!!

Saturday, November 26, 2011

Part 2, Easy as pie apple pie

I guess I am publishing recipes in order of disappearance that pie despite the fact that I hardly had any was gone yesterday... This should tell you how good it. My personal favorite is pecan pie, I have a very good recipe for it, the problem being that I am almost on my own to eat it and we can all agree that this is never a good thing, especially when it comes to pie. This is why I went for apple pie as I know it tends to disappear very quickly. I finally managed not to have my apples completely shrink on me, I think that the trick might be to slice them fairly thinly (unlike what the original recipe calls for...), I also made it quite lemony, which lead to a pie that was much less sweet than was I am pretty sure you are accustomed to. 

The recipe comes from the first blog I started following, 101 cookbooks, it is full of healthy vegetarian recipes. This is the recipe for the pie and my usually pie dough, I used a double pie dough here. I will give both the lemony and regular ingredients, regular in parenthesis and italic. 

Ingredients:
Dough
- 2 1/2 c AP flour
- 1 1/2 stick (1/4 c) cold butter, diced, I dice it and put it in the freezer for 15 min before using
- 1/4 tbsp cold vegetable shortening
- 1/2 tsp salt
- 6-8 tbsp ice water

Filling
- 6 tbsp AP flour (3 tbsp)
- zest and juice of one lemon (1 tsp of zest, 1 tbsp of juice)
- 1/2 tsp ground cinnamon
- 1/4 tsp ground allspice
- 1/8 teaspoon salt
- 2/3 c sugar
- 2 1/2 lb apples, peeled, cored, and cut in thin wedges I use half granny smith and half fuji this time I replace the fuji by golden delicious sometimes

Finishing
- 1 large egg beaten for egg wash
- 1/2 tbsp sugar

Instructions
First prepare the dough 
Place the flour, salt, butter and shortening in the bowl of a food processor equipped with a metal blade.
Pulse until you obtain a wet sand consistency with some pea size pebbles of butter.
 Sprinkle 4 tbs of the ice cold water uniformly and pulse until it just comes together, if the mixture is too dry repeat by adding 1/2 tbsp at a time (6 tbsp is usually the right amount for me every time but it depends where you live, remember that it is much easier to add water than remove it...)
 Test if your dough holds together by squeezing a handful of it as you can see here is should hold together.
 Dump the mixture on a lightly flour surface, divide the dough into 4 equal parts and knead quickly. Form two balls of dough and flatten into disk, wrap tightly and place in the fridge. You can prepare the dough the night before you need it or freeze it at this point.
Preheat the oven to 425F with a cookie sheet placed on the middle rack
Prepare the filling:
- Mix the flour, sugar, salt, cinnamon, all spice, lemon zest and lemon juice in the bottom of a large bowl
- slice the apples on top of it and mix gently, set aside
 Roll out one half of the dough, line the pie plate with at least 1/2 inch overhang.
Place the apple in the shell, roll out the other half of the dough and cover the filling. Trim the edges with kitchen shears, about 1/2 away from the rim, seal by pressing the dough, tuck it under it self and crimp.
 Brush lightly with the egg wash. At this point I usually cut out some decorative pieces out of the trimmed dough before putting the left over in the fridge. Sprinkle with sugar and cut 3 vents with a sharp knife.
Bake the pie on the hot baking sheet for 20 min, reduce the heat to 375F for 40 min, until it is golden brown an bubbly.
Let cool at room temperature 2 to 3 hours.
Serve with some whipped cream or vanilla ice cream if you wish, note that the warmer it is the sweeter it is. Enjoy!!! 

Serves 8

Friday, November 25, 2011

Thanksgiving Part 1, buttermilk biscuits

Thanksgiving it self and the cooking are over but the food is still there to enjoy. I thoroughly enjoyed planning and cooking, cleaning not so much, but who does :). I have left over for everything except for those biscuits I am sharing with you today. I discovered a very dangerous secret yesterday, buttermilk biscuits are as easy to make as they are delicious. They are rich and filling and yet you keep going back for more until you are so full that you feel sick (let's be honest that's part of Thanksgiving...)

Anyway, biscuits are something fairly new to me, until 4 years ago biscuits meant cookies for me and cookies meant choc chip cookies. Having spend 4 years in the south I now know what biscuits are and they have been part a center part of brunch but I always made them out of the can (yes I know, shame on me... but I still cannot make those layered ones... so I might have to get them sometimes.... please don't judge me!!!). Anyway, I always thought that buttermilk biscuits were kind of heavy and tough to make but boy was I wrong! yes they are dense but they are also melt in your mouth delicious, this is if they don't turn into hockey pucks....

I did not modify the recipe I am sharing here at all, this is the original one, please go there for more detailed instructions, this blog is totally awesome, I will just share here my own experience. Like most flaky doughs the key is cold fat and quick work (this and the fact that my hands were kind of yucky is why there is no picture for the last step... sorry). This was the last recipe of the day so hunger was also peeking around the corner and that golden turkey starring at me on the counter top was not helping me be thorough w that recipe I have to admit
Ingredients
- 1 stick of cold butter (1/2 c) (I diced mine and put it in the freezer for 15 minutes before hand)
- 1 c AP flour
- 1 c cake flour
- 2 tsp baking powder
- 1/2 tsp baking soda
- 1 tsp sugar
- 1/2 tsp salt
- 3/4 c cold buttermilk

Instructions
 Preheat the oven to 450F
Put all the dry ingredient in the bowl of a food processor equipped with a metal blade. Pulse a few times until combined.

 Add the butter uniformly and pulse until you get a wet sand consistency with some morsels of butter about the size of peas.
Pour the buttermilk evenly over the mixture (see picture)
Pulse until it comes together into moist clumps.
Dump the mixture on lightly floured surface and quickly form into a ball. Gently flatten into a 3/4 inch circle, cut out your biscuits and repeat until no more dough, I ended up have 6  3' biscuits.

Place on the middle rack of the preheated oven, cook for about 10 minutes or until golden. Devour fresh out of the oven while they are still warm and moist. As you can see this was not the best looking one but they disappeared before I could take a picture... The last survivor was delicious for breakfast with some cranberry sauce. I dare you to try them and not want to make them a Sunday tradition! I know I will be making them soon again :).


I will post two more Thanksgiving recipes later so stay tuned!