Saturday, December 31, 2011

Nut crescents

To end the year beautifully I am sharing the best cookie recipe I made this holiday season. Feel free to enjoy year round, it goes beautifully with coffee or tea, the cookie it self is not overly sweet but it is coated in powdered, it is buttery and nutty, melts in your mouth. I am warning you, if you make those you will want more.

I love toasting nuts, it makes such a world difference, especially in this recipe. If you coat the cookies while they are still slightly warm, the powdered sugar combines with the slight humidity of the cookies and it turns into a paste that reminds of white chocolate but it is a bit of a mess, next time I will wait until they are completely cold.
 
Nut crescents
Recipe from Brown eyed baker 
Ingredients
- 1 1/4 c walnut halves
- 1 1/2 c all-purpose flour
- 1/4 tsp salt
- 1 1/2 sticks (3/4 c) butter, room temperature
- 1 1/2 c powdered sugar
- 1 tsp vanilla extract


Directions
- Preheat the oven to 350F
- Spread walnuts in a single layer on a baking sheet, and toast until light golden and fragrant, about 8 minutes. Reserve and let cool completely. 
- Line two baking sheets with parchment paper.
- In a food processor, combine 1/2 c flour with the toasted nuts, and pulse until the nuts are finely ground.


- In a medium bowl, whisk together the flour-nut mixture, the remaining flour and the salt. Reserve.

- Cream the butter and 1/2 c sugar until light and fluffy. Mix in the vanilla. 
- Add in the flour in two batches, and mix until combined.
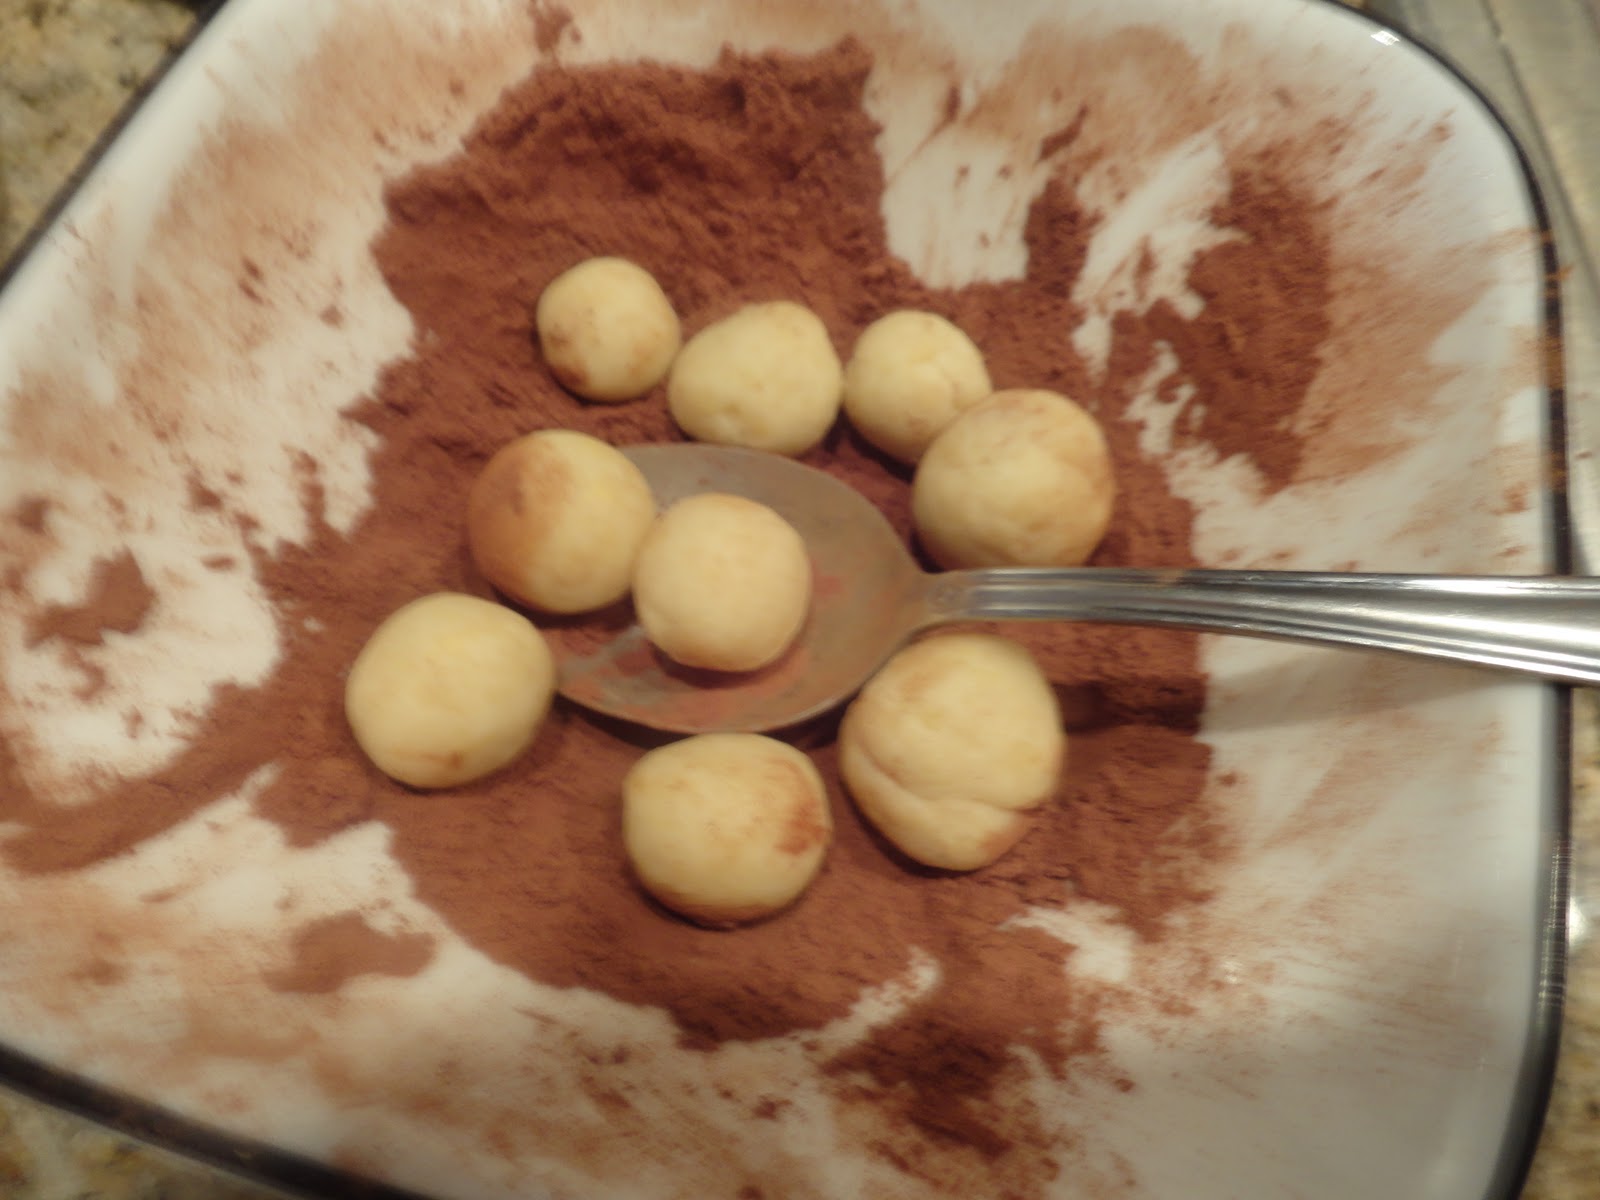
- Roll 1 tsp or tsp of dough into a log. Using your fingers, shape log into a crescent, tapering the ends slightly so that the center is the widest part. Repeat with remaining dough, placing crescents on prepared sheets. 
- Freeze the crescents until very firm.
- Bake, rotating sheets halfway through, until the edges of the cookies begin to turn golden, 16 to 18 min. 
- Cool on the baking sheets for 5 min (the cookies are fragile when they are hot). Transfer cookies to the rack to cool completely. 
- Place the remaining 1 cup sugar in a shallow bowl and roll cookies in it to coat completely. Cookies can be kept in an airtight container at room temperature for up to 5 days (but they won't last that long!!!!)

Enjoy with a warm cup of coffee and tea!

Friday, December 30, 2011

Pretzels and beer soft caramels

This is the last candy recipe I am sharing with you right now, not sure when I will make more, Christmas is the perfect season for that since you can share them with friends and family. I was quite excited about those ass they are quite unusual, they are not my favorite but they are interesting. It's a crunchy salty pretzels on top of a buttery, soft caramel (I liked the previous caramel recipe better but that one does not stick to your teeth as much... ;) ). Because they are so soft they tend to spread, even once wrapped as you can see on the picture. This recipes yields to a lot (over 100) candy! so be ready to wrap and cut, I suggest you ask for some friends help or this might render you insane, I know it would have done it for me if Matt had not been there to help.

Pretzels and beer soft caramels
Recipe adapted from Brown eyed baker
Ingredients
- 1 12-oz. bottle of beer (I used a Samuel Adams winter lagger)
- 2 c sugar
- 1 c brown sugar
- 1 c butter
- 1 c cream (light cream works fine)
- 1 c light corn syrup
- 15 pretzel rods
- 5x5 inch squares of wax paper, for wrapping

Directions
 - Bring 1 c of the beer to a simmer in a small sauce pan. Cooked until reduced and syrupy, about 20 minutes. This will yield about 1 tsp of concentrated beer flavoring. Set aside. (I had more but it worked fine too, if you reduce it more you might get more of a beer flavor than I did)


 - Butter a 9×13-inch pan, line with parchment paper and butter the paper lightly
- Combine the remaining beer, sugars, butter, cream and corn syrup in a heavy bottomed large pot. Cook over medium heat, stirring occasionally until a candy thermometer reaches 244 degrees F (firm ball stage). Watch out it will bubble up very high as it boils
- Stir in the ale reduction and remove from the heat.

- Pour into the prepared pan and top with the pretzel rods.
- Let cool completely, remove the caramel block from the pan and place pretzel-side up on a cutting board, cut and wrap caramels in prepared wax paper squares.

Tuesday, December 27, 2011

Butternut squah mac and cheese

 Another healthy(ish) version of an unhealthy dish, I think that it fits right in the spirit of the holidays. Mac and cheese is such a comforting food, this recipe hit me in all the right spots, you can obviously make it vegetarian by omitting the bacon but let's be honest it's BACON!!!! and it balances out perfectly with the sweetness of the squash.

This is a wonderful recipe, the bechamel gives a creaminess that balances out the possible graininess of the squash, you have the delicious flavor of cheese, the bursts of bacon bits and the crispy bread topping, you could add a layer of cheese under the bread but I like mine in the sauce. I used my brand new Le Creuset cast iron French oven as dish, I could not resist the heart shape, it is so unique and lovely, and it is red (!!!) I simply had to have it!!!

Butternut squash mac and cheese
Recipe adapted from Two peas and their pod
Ingredients
- 1 small butternut squash, peeled, seeded, and chopped
- 1 tbsp oil
- 1/2 lb small pasta (I used small shells)
- 2 1/2 c milk, divided
- 2 tbsp butter
- 3 tbsp AP flour
- 1/8 tsp ground nutmeg
- 2 c cheddar, shredded (I used a mix, I have a preference to sharp or extra-sharp)
- 3/4 c breadcrumbs (I always use panko)
- 4 slices of thick cut bacon (optional)

Directions
- Preheat oven to 400F. Place butternut squash chunks on a large baking sheet. Drizzle oil over the squash and toss. Season well. Roast for 20-30 minutes or until tender, tossing once.
- Place bacon on a cooling rack placed baking sheet lined with aluminum paper, bake until cripsy, about 40 min. Chop to bits. 
- Cook pasta al dente according to package directions, drain well. Set aside.
- Add butternut squash to food processor or blender and puree until smooth. Add in 1/2 c of the milk and puree again
- In a large pot over medium heat, add the butter. When the butter is melted whisk in the flour. Add the nutmeg. Brown the roux, whisking constantly. Slowly add the remaining 2 c of milk and whisk until mixture is smooth. Turn heat to high and bring to a boil while continuing to whisk. 
- Add the cheese, turn heat to low and whisk in butternut squash mixture.
- Stir in the cooked pasta to the pan until well coated. Stir in the bacon crumbs. Adjust the seasoning to taste.
- Pour in an 8 inch square  dish,  sprinkle breadcrumbs on top.
- Place the pan in the oven and bake for 25-30 minutes, or until browned.

Enjoy!!!

Monday, December 26, 2011

Flourless peanut butter cookies

I am sharing with you today one of our favorite and healthiest cookies, yes those adjectives can actually be used in the same sentence and this is the proof. I can promise you anyone you give those to will give you rave reviews, they will never believe that there is no butter, nor flour. I know that PB has quite a bit of fat in but other PB cookie recipes still call for butter, this one doesn't. 

I first made those cookies with regular chocolate chip but Matt found that the chocolate was over powering, the next time I wanted to make bite size cookies so I use mini-chocolate chips and made a batch without to compare and the mini ones were definitely a winner. You can make regular size cookies (1 tbsp) but I love the bite size ones (1 tsp) I purchased cookie scoops of both sizes, they are great for all kinds of things, you should totally give it a shot!

Oh and did you notice that I added a recipe index??? I am super excited about this addition, next step I need to figure out how to add a printable version of the recipes, I am learning, slowly but I am :)

Flourless peanut butter cookies
Recipe adapted from Two peas and their pod
Ingredients
- 1 c creamy peanut butter (I use all natural PB)  
- 1/2 c brown sugar
- 1/2 c sugar
- 1 large egg

- 1 tsp vanilla extract

- 1/8 tsp salt

- 1 tsp baking soda

- 3/4 c mini chocolate chips

Directions
- Preheat the oven to 350F  
- Mix the peanut butter and sugar until creamy and smooth.


- Add the egg and vanilla extract. Mix until well combined.
- Stir in the salt, baking soda, and chocolate chips.


- Spoon dough into balls (I use a cookie scoop), about 1 tsp or 1 tbsp of dough. Place them on lined cookie sheets, leaving space to spread.
- Smash with a fork. Bake for 7-12 minutes (depending on size). Let them sit on the cookie sheet for a couple of minutes. Move to a wire rack and cool. Make sure you don’t overbake. They will melt in your mouth.

Enjoy!!!

Sunday, December 25, 2011

Vanilla and sea salt caramels

Merry Christmas to you all, I hope that you had a great time with your family. It is interesting to me how different Christmas traditions can be from one family to another. I grew up mostly with German traditions in a mixed Catholic and Protestant family. As a child we would always spend Christmas at my gran parents’, when I was young we would go to church with my dad and gran ma on Christmas eve and then come home and open the presents. This is how I would like to keep it (minus the church part…). This year it was just my mom and I, Matt was with his family, so it was just a quiet dinner, recipe will be published soon.

I am sharing a candy recipe today, I made a lot of caramel this year, I am deeply in love with caramel, even though it is a dangerous thing to work with, it can lead to some nasty burns so please be careful. This recipe leads to a deliciously chewy caramel that will stick to your teeth, it reminds me of something in between a French candy called Carambar and hard toffee candy. You should give it a try, they are really easy, the toughest part is wrapping them... Luckily Matt was kind enough to do that for me, I really don't care for it.

Vanilla and sea salt caramels
Recipe adapted from Brown eyed baker
Ingredients
- 1 c cream (light ok)
- 5 tbsp butter, diced
- ½ tsp vanilla
- 1 tbsp vanilla bean paste
- 1¼ tsp sea salt
- 1½ c sugar
- ¼ c light corn syrup
- ¼ c water

Directions
 - Line an 8-inch buttered square baking pan with parchment paper, then lightly butter parchment.
- Bring cream, butter, vanilla extract, vanilla bean paste, and sea salt to a boil in a small saucepan, then remove from heat and set aside.
 - Bring the sugar, corn syrup, and water in a medium to large heavy saucepan over medium heat, stirring until sugar is dissolved. Boil, without stirring but gently swirling pan, until mixture is a light golden caramel (don't be too shy w it, it has to be golden).

- Carefully stir cream mixture into the caramel (mixture will bubble up) and simmer, stirring frequently, until caramel registers 248 on thermometer. Pour immediately into the prepared baking pan and cool completely 
- Cut into about 1-inch square pieces, and then wrap each piece in a 4-inch square of wax paper, twisting 2 ends to close.

Enjoy!! (and share ;) )

Saturday, December 24, 2011

Chicken koftas

I apologize for this horrible horrible picture, I was really hungry and didn't really take time to clean the background, it is also kind of hard for me to make pretty pitas that hold well together :). 

I absolutely love this recipe, it is very easy and great the very strong cravings I can have for middle eastern food. Here we have a nice Iranian place where I can get that fix but it was the first time since I came to the US. Those chicken koftas are chicken meatballs (or patties) with middle eastern flavors. 

I eat them in a pita or with the same ingredients as a salad, for that I chop the koftas. Before I get to the meat of the recipe, let me discuss the toppings, it is really up to you but I enjoy lettuce, tomato and cucumber (I love those small Persian cucumbers that you can see on the left of the picture) and my to go sauce, Greek yogurt pulsed with cilantro, salt and pepper. It makes a great salad dressing too!
Feel free to add thinly sliced onions and garlic to the sauce.

Chicken koftas
Recipe adapted from Bev cooks
Ingredients
- 1lb ground chicken
- 1/2 onion, finely chopped
- 1/2 tsp ground cumin
- 1/2 tsp ground coriander
- 1/2 tsp all spice
- 1/2 tsp salt
- 1/4 c cilantro chopped
Toppings
- 1 tomato, diced
- 1 small cucumber diced,
- 1 c of shredded lettuce
- 1/4 c greek yogurt
- 1/2 c cilantro
- 1/2 tsp lime juice
- pita pockets

Directions
- Mix all the the meatball ingredients (meat, spices, onion and cilantro) together in a bowl
- Form small meat balls (or patties) about 1 tbsp
- Heat oil in a large skillet over medium heat, add the meatballs, brown one side, flip and brown on the other side.
- In the mean time pulse the yogurt, lime and cilantro together. Season.
- Heat the pita in the microwave for 15s under a damp paper towel 
- Open the pocket, add sauce, topping and meatballs.

You can also skip the pita, use more topping and turn it into a salad using the sauce as dressing and a few very thin onion slices.

Enjoy!

Friday, December 23, 2011

Sables


Back to cookies, I am keeping the best for last but today I am sharing a family recipe. This recipe was not planned but Matt received some interesting cookie cutter as early Christmas present and was very excited to test them. I had never seen cookie cutters like that, they are a lot of fun! You can see the results on the left, aren't they cute?

Like the marzipan this is a recipe that comes from my mom's side of the family. This recipe caused me some trouble, I don't really know what happened, I made it dozens of time as a child and it worked perfectly but this time I had to double the cornstarch to get the texture right... I am giving you both measurements (original and current). They make delicious tea (or coffee) cookies and I would think you can add icing if you wish, the original recipe also calls for lemon zest but I never used it so I skipped it.
 
Sables
Ingredients
- 2sticks (1c) butter (250g), room temperature
- 200g sugar
- 1 egg
- 250-500g cornstarch
- 5g baking powder (1/2 sachet levure chimique)
- 1 tsp vanilla extract


Directions
 - Preheat oven to 350F
- Cream butter, sugar and egg
- Stir in 250g of cornstarch, baking powder and vanilla extract. Add more cornstarch if needed, the dough should come together and be dry enough to roll (1/4' thickness) and cut out cookies.
- Place cookies on a baking sheet lined with parchment paper. they might expand a little but not much
- Bake 10-15 min (depending on size) until they are golden, keep an eye on them, they can burn on you in an instant.
- Remove from the oven let cool on the baking sheet for a few minutes, otherwise they will break when you try to move them, they are very fragile when hot. Finish cooling on a cooling rack.

This dough should make a few dozen cookies (depending on size)

Enjoy!!!

Thursday, December 22, 2011

Chocolate covered almond pralines

Are you all set for Christmas? all your little ducks in a row? I am not, I will go shopping today for some inspiration. I am thinking something simple, it will be just my mom and  anyway. I am thinking soup, some kind of small bird, potato latkes and maybe a nice cheese. I am done cooking until Saturday, I have plenty of leftovers from recipes I still have to share.

Back to candies, I have 2 more kind of candies to go but I am trying to give you some diversity. I am not sure why but nuts are very Christmas-y to me, this is once again an almond recipe. It is simple and yet delicious and it will for sure look fancy and delight whoever you share them with

Chocolate covered almond pralines
Recipe from Martha Stewart
Ingredients
- 13oz whole almonds
- 1 c sugar
- 1/4 c water
- 11/4 tsp salt
- 6 oz semi-sweet chocolate, chopped (or chips)
- 1/4 c unsweetened cocoa powder

Directions
- Preheat the oven to 350F
- Toast almonds in a single layer until fragrant, about 15 min, let cool
- Bring sugar and water to a boil, stirring until the sugar dissolves. Cook without stirring until a candy thermometer reaches 235F
- Add the nuts, stirring until the nuts are coated and the sugar crystallizes
- Stir in the salt, cook, stirring until the sugar forms a thin sand like coating on the nuts
- Pour the mixture on a parchment lined baking sheet, separating the clusters with a forks, cool completely, separate individual nuts, sift in a colander to remove excess sugar and place in a large bowl


- Melt the chocolate in a double boiler. Pour over the nuts and coat.
- Pour over 1 (or 2) baking sheets lined with parchment paper. Separate as well as you can, any nuts that are touching will stick together as they cool.
- Refrigerate 30 min, until firm. Toss separated nuts in cocoa in a large container, you can do it in a bowl but closing a container and shacking it is much easier to get uniform coverage.

Enjoy!

Wednesday, December 21, 2011

New potatoes with onions and sausage


I am giving you a little break from sweets today, before baking the last cookies for Christmas. This recipe is very simple and delicious, I promise you won't be able to get enough of it!

It is an interesting variation on meat and potatoes
and you have to love the charred potatoes, at least I do. I was the first recipe I made in my brand new cast iron skillet, I lot it, it is so convenient to get some nice browning! the silicon handle is a must if you consider getting one :).

I apologize for the pictures, my camera has been acting up on me...

New potatoes with onions and sausage
Adapted from Bev cooks
Ingredients
- 1.5 lb new potatoes, skin on, halved or quartered depending on size
- 3 cups water
- 2 tbsp Dijon mustard
- 1 tbsp smoked paprika
- 2 tsp white vinegar
- 1 1/2 cup vegetable or chicken stock
- 2 dried bay leaves
- 2 onions, roughly chopped
- 4-5 brats, 1 package, sliced (freezing them slightly helps slicing)

Directions
- Mix the water, mustard, paprika, vinegar and chicken stock, bay leaves & 1/2 tbsp salt in a medium pot, bring to a boil, simmer for a couple minutes.
- Add potatoes and onions, simmer for 15 min. (until cooked through)
- Drain the potatoes and onion (the original recipe calls for letting them sit in the water for 15 min but I skipped it, this might enhance the flavor)
- Heat oil in a large skillet over medium high heat (medium if using a cast iron skillet)
- Add potatoes, onions and sausage, brown tossing often (to avoid burning) until the sausage is cooked through and you have nice browning.
- Fish the bay leaves out and serve

Enjoy!!!

Tuesday, December 20, 2011

Coffeecake muffins

I am not sure if it is Christmas coming around the corner or my mom being here but recipes are piling up!!! I had a hard time to decide what to share with you next. I think that I need to make a list so that I don't skip anything!

I decided to share one of the recipes I made for Matt's office party, I have a mildish nut (walnut and now pecan :( ) allergy so I could only taste a bite of those coffeecake muffins but none of them came back so I assume this means that they are approved ;).

I love love love coffeecake (who doesn't???) and any cake that has sour cream in it so I was quite excited about those, I just wish the pecans wouldn't give me sores... (this worries me a little, because pecan pie is my favorite boohoohoo)

Anyway, here we go:
Coffeecake muffins
Recipe from Brown eyed baker
Ingredients
- 1/2 c pecans
- 1/4 c brown sugar
- 1 tsp cinnamon
- 2 c AP flour
- 1 c sugar
- 1 stick (1/2 c) butter, cubed and softened
- 1 1/2 tsp baking powder
- 1/2 tsp baking soda
- 3/4 c sour cream
- 1 large egg
- 1 tsp vanilla extract

Directions
Preheat oven to 350F.
Place the pecans, brown sugar and cinnamon in the bowl of a food processor equipped with a metal blade, pulse in a coarse meal (pecans about the size of sesame seeds).
Reserve
Pulse the flour, sugar and salt in the food processor until combined. Sprinkle the butter uniformly over the mixture and pulse until it has the texture of wet sand (butter about the size of oats)
Add 1/2 c of the flour mixture to the pecan mixture, combine with a fork.
Add baking soda and baking powder to the remaining flour mixture, pulse until combined.
Mix sour cream, egg and vanilla, whisk until combined.
Pour uniformly over the flour mixture, pulse until the flour is just moistened. 
Add 3/4 of the pecan mixture to the flour and pulse until just distributed, reserve the rest for topping.
Divide uniformly among 12 lined muffin cups, divide the pecan mixture among the muffins.
Bake until a toothpick inserted in the center of the muffin comes out dry (almost), about 18 minutes.
Enjoy!

Monday, December 19, 2011

Marzipan

I spent the week end getting treats ready to give away for Christmas, I am done with the the candy part, I still have muffins today and cookies over the next few days so that they are not stale by Christmas. 

I am also going back to work, getting ready to teach in January, which is why I will probably have less time to spend posting but I promise, even if I have a back log of recipes I will share them with you! Right now I have 6 recipes to share. 

What I am sharing with you today is not really a candy but it is by far my favorite treat I made. It is a childhood recipe that comes from my mom's family, I use to make it for Christmas as a child which is why as soon as I smelled the rose water it was finally Christmas for me! I love those sensory experiences, it is so amazing how your brain makes connections like that.

The original recipe calls for 25g of bitter almonds but as they contain cyanide, they might be hard to come by, I know that in Germany you have to go to a pharmacy counter to buy them. You can easily replace it by flavoring, and you can find it online, mine came from Germany... do not skip it though, it perfectly balances out  with the sweetness. So does the cocoa powder.
(
I do apologize for the metric system but this is a German recipe I treasure deeply as it came from at least my gran ma, if not further. You can easily size it down as it is a felt recipe, just equal amount of almonds and sugar.
Marzipan
Ingredients
- 500g whole almonds, blanched and peeled
- 500g powdered sugar
- 4 to 6 tbsp rose water
- 1/8 to 1/4 tsp bitter almond extract (to taste)
- unsweetened cocoa powder for rolling (Dutch processed preferably)

Directions
 Blanche the almonds by pouring them in some boiling water for a minute. Drain and place in an ice bath to stop the cooking process, and allow you to handle them. They should squeeze right out of their skin
 Grate the almonds in a food processor, the smallest possible. Then equip your food processor with a metal blade and pulse into a meal (more or less coarse depending on your taste, I like it on fine side).
Place into a large bowl, add the sugar and mix (with your hands or a spoon).
Add the rose water, incorporating it thoroughly, you will knead it as a dough, 4 was enough for me. I am warning you that it takes a while to incorporate so don't be too fast to add more rose water.
Incorporate the bitter almond extract, add more to taste.
Form small balls of dough and roll into the cocoa powder.
Enjoy!!!

Friday, December 16, 2011

Chicken cacciatore

Food has always played a center role in my life and I believe that this is a family thing, this is maybe why I now realize that some food, flavors or tastes have the power to bring back memories. This hit me fairly hard on Thanksgiving actually, I was in the kitchen, the turkey was in the oven, stock was simmering on stove and all of a sudden the warm feeling in my back and the smell transported me in my gran ma's kitchen as a child. I am not sure exactly why that happened but it was so strong that before I knew it I had tears running down my cheeks and I was overwhelmed with happy memories.

The dish I am presenting you with today was inspire by Bev from Bev cooks, I love her blog, she always makes me smile. I was very inspired by the picture and did a few modifications so it would match more my favor profile and cooking style. Interestingly enough Matt supposedly hates chicken cacciatore, at least that's what he thought until he tried this one!!!! It is a very simple, healthy and delicious recipe, you should totally try it. Something unexpected, happened when I tasted it, I felt back home, eating a dish my dad had cooked. My dad is a very good cook, I have never seen him follow any kind of recipes but he experiments a lot and it magically turns out delicious :), he does not have a particular flavor profile, at least that's what I thought... until this happened.... we have very different cooking techniques and yet we seem to have strange similarities.

I made this using a whole chicken but you use chicken thigh or breasts is you would rather, that is really up to you.

Chicken cacciatore
Ingredients
- 1 whole chicken, cut into 8 pieces (check this link out for help, it's really fairly simple)
- salt & pepper
- 1 onion, chopped
- 1 large carrot, chopped
- 1 large celery stalk, chopped
- 1 large red bell pepper, chopped
- 4 or 5 garlic cloves, chopped
- 3 springs of thyme
- 2 bay leaves
- 1 (28oz) can peeled tomatoes
- 1/3 c red wine
- 2 tbsp flour

Directions
 Rinse the chicken and pat it dry, cut into eight pieces, I freeze the back for later use in stock.
Season well.
 Heat oil in a large skillet over medium heat, place the chicken pieces, skin side down. If you do not hear a sizzle, remove the chicken and wait some more. DO NOT MOVE until it is brown, if won't let you move it anyway. Season, flip and brown the other side.
Set aside.
 Discard the fat if there is any, add a little bit of oil. Add the onion and cook a couple minutes.
Scrape all the brown bits of flavor with the steam generated by the veggies

Add the rest of the veggies and herbs (carrots, celery, bell pepper, thyme, bay and garlic). Saute until soft, about 10 min.
Add the tomatoes, you can chop them but I do enjoy crushing them in my hands. Add the wine.
Return the chicken, bring to a boil, cover and simmer for 45 min.
Reserve the chicken, make a slurry with the flour and some of the sauce, add it to the pot and simmer to thicken.
Serve with rice or pasta. 
Enjoy!!!

I am off to Christmas candy wonderland!!! I will share with you the recipes that are successful and will be sent to friends and family